Ultimate Guide: How to clean engine bay with a simple step!
Hello everyone good morning and good to see you again, today I want to share about the cleaning process of the engine bay. Cleaning the engine bay is really important.
Sometimes we forget to clean the engine bay, because we believe that the engine bay is not important. But in fact, it’s really important.
And I believe you guys also waiting for this ultimate guide to clean your engine bay with simple steps right?. so many requests from you guys to share about this topic.
I will guide you on how to super clean your engine bay even if you can put your food on it. so, what are you waiting for? let’s start to clean your engine bay with a simple step-by-step guide.
Is not about the appearance, but also about the performance of the engine. If the engine bay is dirty, it can cause the engine to overheat, or even worse, it can damage the engine. And you cannot fix it back into a good condition.
So you understand right? cleaning the engine bay is really important. And here is the ultimate guide to clean your engine bay with simple steps.
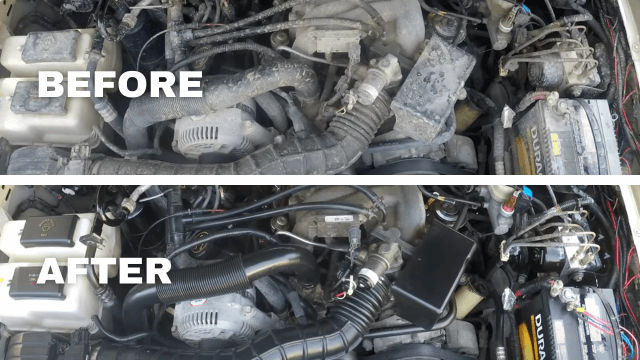
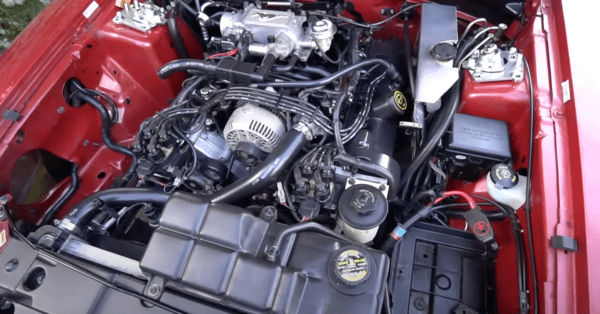
*Before After Cleaning Engine Bay
Step by Step How to Clean Engine Bay
After you see the image above, you can see the difference between before and after cleaning the engine bay. And now, let’s start to clean your engine bay with simple steps.
1. Prepare the tools and materials
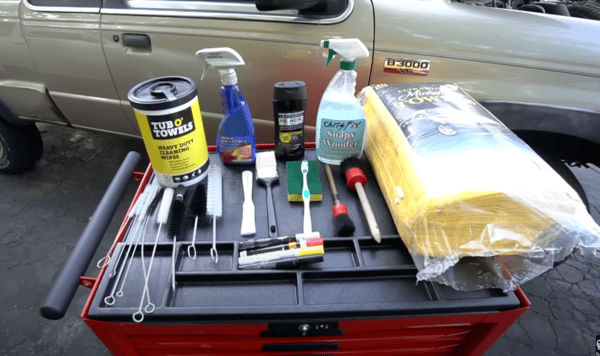
First, you need to prepare the tools and materials to clean the engine bay. Here are the tools and materials you need to prepare:
Brush
We need different types of brushes, such as a soft brush, a hard brush, and a toothbrush. You can use a soft brush to clean the engine bay, a hard brush to clean the dirt, and a toothbrush to clean the small parts.
Soapy water
You can use soapy water to clean the engine bay. You can mix the soap with water and put it in a spray bottle. it will be easier to apply the soapy water to the engine bay.
Especially for the deepest engine bay, you just spray the soapy water and let it sit for a few minutes. it will make the dirt easier to clean.
Microfiber towel
Microfiber towels are one of the useful tools that you need to prepare. You can use it to clean the engine bay and also to dry the engine bay. because in the process we have 2 types of cleaning, wet and dry.
Degreaser
This is an optional tool, but it can help you to clean the engine bay. You can use a degreaser to clean the engine bay. but if you don’t have soapy water also okay.
Blower
You can use any type of blower as long it can blow, you can use an air compressor, leaf blower, or even a vacuum cleaner that has a blower feature, this blower is useful for drying the engine bay process.
2. Dry Cleaning
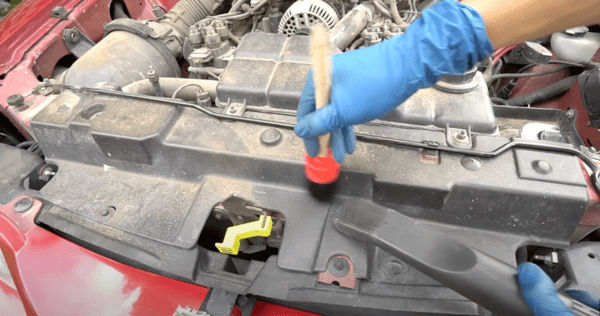
Okay, after we prepare the tools and materials, now we can start to clean the engine bay. First, we need to do dry cleaning.
First of all, and the most important thing is, to make sure your engine is cold, and make sure your car is shut off. you don’t want to clean the engine bay when the engine is hot right?
Clean Top To Bottom
After you have tools in hand, you can start cleaning the engine bay from top to bottom. you can use the soft brush to clean the engine bay, and also you can use the blower to blow the dirt.
Clean The Dirt, Dust, and Debris
Dry cleaning is more focused on the dirt, dust, and debris. you can use the hard brush to clean the dirt, dust, and debris. and also you can use the blower to blow the dirt, dust, and debris.
Clean parts as you can go
I know every type of engine has different parts, engine, and location, you can clean the parts as you can go. you can use the toothbrush to clean the small parts.
3. Wet Cleaning
Wet cleaning is the next step after dry cleaning, the purpose of wet cleaning is to focus on the dirt that cannot be cleaned by dry cleaning, such as oil, grease, and other dirt.
Detach the battery
This step is very crucial, you need to detach the battery before you start wet cleaning. you can use a wrench to detach the battery. remove the positive terminal first and then the negative terminal.
We don’t want to damage the battery and electrical parts right? So make sure you detach the battery before you start wet cleaning.
Cover the sensitive parts
Before you start wet cleaning, you need to cover the sensitive parts, such as the alternator, ECU if located inside the engine bay and the fuse box. you can use plastic or aluminum foil to cover the sensitive parts.
Especially for the alternator, you can use a plastic bag to cover the alternator. make sure the alternator is completely covered. if you damage the alternator, it will cost you a lot of money.
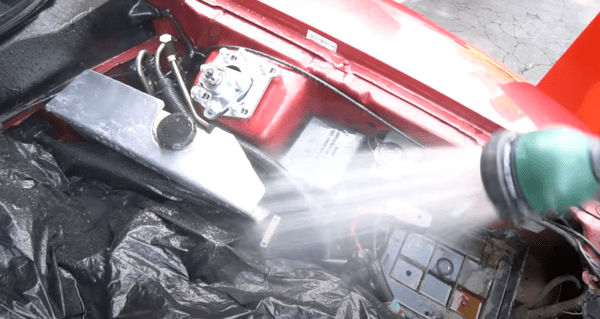
Spray engine using water pressure
After you cover the sensitive parts, you can spray the water using water pressure, using water pressure will make the dirt easier to clean.
Note: do not to too close to the sensitive parts, only parts that have dirt and are resistant to water.
Apply the soapy water and degreaser
Okay after you spray the water, you can apply the soapy water and degreaser to the engine bay. you can use the soft brush to clean the engine bay.
Make sure you clean the engine bay thoroughly and clean the dirt, oil, and grease. as deep as you can go.
This step is not easy, but with patience and thoroughness, you can clean the engine bay thoroughly.
Don’t forget after you apply soapy water make sure you let it sit for a few minutes, rinse the engine bay with water pressure again, make sure you don’t leave any soapy water, and degreaser.
Dry the engine bay
We can use the same tools for dry cleaning, you can use the blower to dry the engine bay. you can use an air compressor, leaf blower, or even a vacuum cleaner.
You can use a microfiber towel to fasten the drying process, but make sure you use a clean microfiber towel.
Let’s wait until the engine bay is completely dry and then you can remove the cover from the sensitive parts.
Detailing
This step is optional, but if you want to make your engine bay look like new, you can do detailing. you can use the plastic and rubber conditioner to make the plastic and rubber parts look like new.
You can use conditioner also to make the engine bay look shiny and clean. Different types of conditioners have different ways to apply, make sure you read the instructions before you apply it.
Final Check
After everything is done, you can do the final check. make sure you check the engine bay thoroughly and make sure you don’t leave any dirt, oil, and grease.
Reattach the battery
After the cleaning process is done, you need to reattach the battery. make sure you reattach the battery correctly. Put the positive terminal first and then the negative terminal.
Start the engine
After you reattach the battery, you can start the engine. make sure the engine is running smoothly and there is no problem with the engine. wait for the engine until it reaches the normal temperature.
Take a picture
After everything is done, you can take a picture of the engine bay. you can compare the before and after cleaning the engine bay. This process we called a feedback process.
we need to see what we have done, and what we can improve for the next cleaning process.
Video Tutorial
If you want to see the video tutorial, you can watch the video below:
Just in case you still have a question, you can check out the video tutorial above :).
Conclusion
In conclusion, cleaning the engine bay is important. not only for the appearance but also for the performance of the engine.
If you want to know more about your vehicle condition, you also can track your fuel consumption and vehicle expenses with Fuelpro, this way you can understand more about vehicle condition and how much money you spend on your vehicle.
I think that’s all for today, I hope you enjoy the ultimate guide to clean your engine bay with simple steps. and thank you to chrisFix channel for the video tutorial.